barbie in the cake step by step 2025
Barbie cake that will make your little one’s birthday unforgettable? This comprehensive guide will walk you through every step, from baking the cake to dressing the doll in a beautiful frosting gown! Whether you’re a baking novice or an experienced cake decorator, you’ll find everything you need to create a magical Barbie cake that will be the centerpiece of any celebration.
Table of Contents
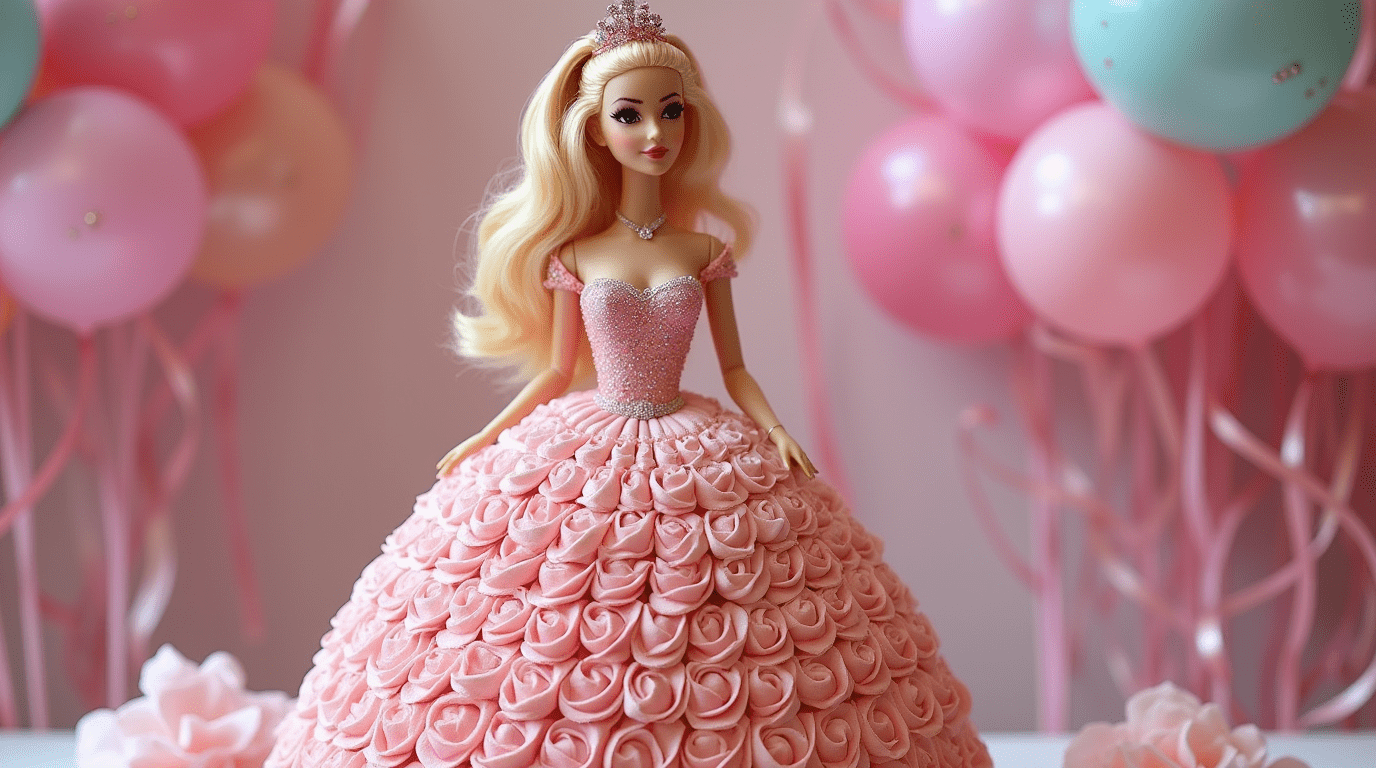
![Beautiful finished Barbie cake with an elegant buttercream dress in pink ombre colors]
Understanding the Barbie Cake Concept
What is a Barbie Cake?
A Barbie cake (also known as a doll cake or princess cake) features a Barbie doll inserted into the center of a cake, with the cake itself forming the doll’s dress. This magical creation transforms a regular cake into a three-dimensional masterpiece where the Barbie’s upper body emerges from a beautiful edible gown. The charm of having Barbie in the cake creates an enchanting centerpiece that delights children and adults alike.
The beauty of the Barbie cake lies in its versatility – you can customize the “dress” with different colors, decorations, and cake flavors to match your party theme or the birthday child’s preferences.
Variations
There are several ways to approach creating your Barbie in the cake masterpiece:
- Traditional Barbie Cake: Using a real Barbie doll with the cake forming her dress
- Fondant Doll Alternative: Creating the entire doll (including upper body) from fondant
- Mini Barbie Cake: Using a smaller doll for petite cakes
- Half Doll Method: Using specialty half-dolls designed specifically for cake decorating
Skill Level
Don’t worry if you’re new to cake decorating! This guide breaks down the Barbie cake creation process into manageable steps suitable for bakers of all skill levels. With the right tools and a bit of patience, even beginners can create a stunning Barbie cake that looks professional.
Gathering Your Supplies
Ingredients
For the Cake Base:
- 4 cups all-purpose flour (or cake flour for lighter texture)
- 3 cups granulated sugar
- 1 tablespoon baking powder
- 1 teaspoon salt
- 1 cup unsalted butter, softened
- 1 cup vegetable oil
- 1 cup milk
- 8 large eggs
- 2 tablespoons vanilla extract
- Food coloring (optional)
For the Buttercream Frosting:
- 6 cups powdered sugar
- 2 cups unsalted butter, softened
- 2-3 tablespoons milk or heavy cream
- 2 teaspoons vanilla extract
- Gel food coloring of your choice
- Optional decorations: sprinkles, edible pearls, edible glitter
Equipment
- Barbie doll (preferably one with removable legs)
- Specialty doll cake pan OR a set of different sized round cake pans (8-inch, 6-inch, and 4-inch)
- Stand mixer or hand mixer
- Piping bags and tips (star tips and round tips work best)
- Offset spatula
- Serrated knife for leveling cakes
- Cake board (at least 10 inches)
- Plastic wrap (to wrap the doll)
- Aluminum foil
- Cake dowels or straws for support
- Rotating cake stand (highly recommended)
The Barbie Doll
When choosing a Barbie doll for your cake, consider these important tips:
- Select the right doll: Use a doll with removable legs if possible, as this makes insertion easier and requires less cake height.
- Prepare the doll properly: Before inserting the doll into any food, thoroughly wash and sanitize it with hot, soapy water and allow it to dry completely.
- Create a protective barrier: Wrap the doll’s lower body in plastic wrap before inserting it into the cake. This maintains hygiene and prevents the doll from being stained by the cake or frosting.
- Consider a specialized doll pick: Cake supply stores sell “doll picks” which are torsos specifically made for these cakes if you prefer not to use an actual Barbie.
Baking the Cake
Choosing Your Cake Flavor
The beauty of a Barbie in the cake creation is that you can choose virtually any cake flavor that holds its shape well. Here are some popular options:
Classic Vanilla Cake:
- Light, versatile, and loved by most people
- Takes food coloring well if you want a colorful cake interior
Rich Chocolate Cake:
- Decadent and always a crowd-pleaser
- Creates a nice contrast if using light-colored frosting
Strawberry Cake:
- Perfect for a pink-themed Barbie cake
- Complements the traditional Barbie aesthetic
Marble Cake:
- Offers the best of both vanilla and chocolate
- Creates an interesting pattern when sliced
Baking the Cake Layers
Step 1: Preheat your oven to 350°F (175°C). Grease and flour your cake pans, or line them with parchment paper.
Step 2: In a large bowl, sift together the flour, baking powder, and salt.
Step 3: In a separate bowl, cream together the butter and sugar until light and fluffy (about 3-4 minutes).
Step 4: Add eggs one at a time, beating well after each addition.
Step 5: Mix in the vanilla extract and vegetable oil.
Step 6: Gradually add the dry ingredients to the wet ingredients, alternating with milk, beginning and ending with the dry ingredients.
Step 7: If using food coloring, fold it in gently at this stage.
Step 8: Pour the batter into your prepared pans. If using a specialty doll cake pan, follow the manufacturer’s instructions. If using regular round pans, distribute the batter between your 8-inch, 6-inch, and 4-inch pans.
Step 9: Bake until a toothpick inserted into the center comes out clean. Approximate baking times:
- 8-inch pans: 30-35 minutes
- 6-inch pans: 25-30 minutes
- 4-inch pans: 20-25 minutes
Step 10: Allow the cakes to cool in their pans for 10 minutes, then turn them out onto wire racks to cool completely.
Creating the Cake Shape
To create the classic dome shape for the Barbie cake dress:
If using a specialty doll cake pan:
- Simply follow the pan instructions for baking and assembly.
If using regular round cake pans:
- Once completely cooled, level the tops of all cakes with a serrated knife to create flat surfaces.
- Stack the cakes from largest to smallest (8-inch on bottom, then 6-inch, then 4-inch).
- Using your serrated knife, carefully carve the stacked cakes into a dome shape, creating a smooth transition between layers. Work slowly and step back occasionally to check your progress.
- Brush away loose crumbs before frosting.
Pro tip: What is the weight of Barbie cake? A completed Barbie cake typically weighs between 5-8 pounds depending on the number of cake layers and amount of frosting used. Keep this in mind when planning for transportation!
Making the Frosting
Choosing Your Frosting
The frosting is what transforms your cake into a beautiful Barbie dress! Here are your main options:
Buttercream Frosting:
- Easiest to work with for beginners
- Holds piped designs well
- Can be smoothed or textured as desired
Fondant:
- Creates a perfectly smooth finish
- Allows for more detailed dress decorations
- More challenging to work with but offers a polished look
Whipped Cream Frosting:
- Lighter alternative to buttercream
- Requires refrigeration until serving
- Best for same-day consumption
Making Buttercream Frosting
Step 1: In a stand mixer with the paddle attachment, beat the softened butter on medium speed until creamy (about 2 minutes).
Step 2: Gradually add the powdered sugar, 1 cup at a time, mixing on low speed until incorporated.
Step 3: Add the vanilla extract and 2 tablespoons of milk or cream.
Step 4: Increase the speed to medium-high and beat for 3-5 minutes until the frosting is light and fluffy.
Step 5: If the frosting is too thick, add more milk, one teaspoon at a time. If it’s too thin, add more powdered sugar.
Coloring the Frosting
For a single-color dress:
- Add gel food coloring to your buttercream a little at a time.
- Mix thoroughly until you achieve your desired shade.
- Remember that colors will darken slightly as they set.
For an ombre effect:
- Divide your frosting into 3-4 bowls.
- Leave one portion white (or your lightest shade).
- Add progressively more gel food coloring to each remaining portion.
- This creates a beautiful gradient effect on the dress.
Assembling the Barbie Cake

Crumb Coating
Step 1: Place your carved cake on a cake board or serving platter.
Step 2: Using an offset spatula, spread a thin layer of frosting over the entire cake.
Step 3: Refrigerate for 15-30 minutes to set this “crumb coat,” which seals in any loose crumbs.
Frosting the Cake
Step 1: Before starting the final frosting layer, make a hole in the center of the cake for the Barbie doll. Use a knife or apple corer to create a hole slightly wider than the doll’s body.
Step 2: Insert a cake dowel or sturdy straw into the center hole for additional support if needed.
Step 3: Wrap the lower half of the Barbie doll in plastic wrap and carefully insert her into the hole, adjusting the depth so that the doll’s waist is level with the top of the cake.
Step 4: Apply a generous layer of frosting all over the cake, smoothing with an offset spatula or bench scraper.
Creating the Dress
This is where your Barbie in the cake creation truly comes to life!
For a Smooth Dress:
- Use an offset spatula to apply frosting evenly around the cake.
- Smooth the surface with a bench scraper or spatula.
- Create gentle contours to mimic the folds of a dress.
For a Textured Dress:
- Use various piping tips to create decorative elements:
- Star tips for rosettes or ruffles
- Petal tips for overlapping “fabric” layers
- Round tips for pearls or beading
Step-by-Step Ruffle Dress:
- Fill piping bags with your colored frostings.
- Starting at the bottom of the cake, pipe horizontal rows of ruffles using a petal tip (#104 works well).
- Work your way up the cake, slightly overlapping each row.
- If doing an ombre effect, transition from darker colors at the bottom to lighter shades as you move upward.
- Finish with decorative details around the doll’s waist to create a seamless transition.
Final Touches
- Add decorative elements like buttercream flowers, edible pearls, or sprinkles.
- Use a small amount of frosting to create “sleeves” or “straps” on the doll if desired.
- For extra sparkle, carefully apply edible glitter or luster dust to the dress.
Variations and Customizations
Different Cake Flavors
- Red Velvet: Rich flavor with dramatic effect when cut
- Confetti Cake: Fun surprise inside with colorful sprinkles
- Lemon: Light, refreshing alternative for summer parties
Different Dress Designs
- Princess Ball Gown: Full, elaborate skirt with ruffles and swirls
- Mermaid Style: Narrower at the top with a flared bottom
- Tiered Design: Distinguished layers resembling a wedding cake
Allergy-Friendly Options
Gluten-Free Barbie Cake:
- Substitute all-purpose flour with a gluten-free all-purpose flour blend (look for one with xanthan gum included)
- Add an extra egg for structure
Dairy-Free Options:
- Replace butter with dairy-free margarine or shortening in both cake and frosting
- Use coconut milk or almond milk instead of regular milk
Egg-Free Version:
- For each egg, substitute with ¼ cup applesauce or one mashed banana
- Alternatively, use a commercial egg replacer following package directions

Troubleshooting Tips
| Problem | Solution |
|---|---|
| Cake is dry | Add simple syrup to cake layers before frosting |
| Frosting is too thin | Gradually add more powdered sugar |
| Frosting is too thick | Add small amounts of milk until desired consistency |
| Cake is cracking | Ensure cake is completely cooled before frosting; reinforce with dowels |
| Doll is sinking | Insert a sturdy dowel through the center of the cake for additional support |
| Frosting melting | Refrigerate cake for 30 minutes, then continue decorating in a cool room |
How to Store a Barbie Cake?
A common question for many bakers is how to store a Barbie cake properly. Follow these guidelines:
- Short-term storage (1-2 days): Store at room temperature in a cool, dry place covered loosely with a cake dome or tent of foil (being careful not to touch the frosting).
- Longer storage (3-5 days): Refrigerate the cake. First, chill the cake uncovered for 20 minutes to set the frosting, then loosely cover with plastic wrap or place in a cake box.
- Before serving: If refrigerated, allow the cake to come to room temperature for 1-2 hours before serving for best flavor and texture.
- After cutting: Press plastic wrap against exposed cake surfaces to prevent drying out.
- Removing the doll: If you plan to save the doll, carefully remove it from the cake, wipe off excess frosting, and wash with warm, soapy water.
Barbie Themed Party Ideas
Complete your Barbie cake celebration with these coordinating party ideas:
Decorations
- Pink and purple balloon arches
- Barbie silhouette cutouts
- Fairy lights for a magical atmosphere
- Tiara centerpieces on guest tables
Activities
- Barbie fashion design station with paper dolls
- “Design a Dream House” craft table
- Barbie-themed photo booth with props
- Princess makeover station with child-friendly makeup and accessories
Favors
- Mini Barbie dolls or accessories
- Princess tiaras or wands
- Personalized cookies in dress shapes
- Pink sparkly slime in small containers
Conclusion
Creating a stunning Barbie in the cake masterpiece is a magical experience that will delight any Barbie fan. With the right preparation, tools, and techniques, you can craft a beautiful cake that serves as both dessert and the centerpiece of your celebration. Remember, perfection isn’t necessary—the joy is in the creative process and the delight on your guest of honor’s face!
Have you made a Barbie cake before? What’s your favorite Barbie cake design or color scheme? Share your creations on social media using #BarbieCakeMagic and inspire others to try this classic birthday treat!